Equipment
- Air Compressor
- Pressure Regulator
- Hose
- Fittings
- Spray Paint Gun - LVLP Low Volume require less air volume, HVLP - High volume requires more air, HTE High Transfer Efficiency, 1.3, air control, flued, fan, regulator, needle, flued full open,
- Safety Protection - Coveralls, Protective Eyewear, Respirator Face Masks, Knee Pads, Disposable Gloves
- Conventional - Use high pressure, 40-75 PSI, overspray, fog, smooth finish
- LVLP - Low Volume Low Pressure
- HVLP - High Volume Low Pressure 65% transfer efficiency 30PSI, higher volume of paint, orange peel, less overspray, primer, base coats, cap pressure > 10PSI
- HTE - High Transfer Efficiency, conventional spray, transfer rate like HVLP, EPA Approved. Good for finishing, Clear Finer finish, problem with metal base coat.
- Fluid -
- Fan -
- Pressure - 35psi
- Air Valve at the bottom -
- Airhead
- Flow regulator
- Nozzle or peak
- Tank (depending on its type the gun can have a deposit or be connected to a tank)
- Low Pressure Aspersion
- Airless
- Airless Air Assisted
2K clear coat
1500 grit
spray booth
2.
Air circulation - Incoming and exhaust
3. Lighting (protected from spray)
4. Drying booth
3 mil 10x25" Polar Plastics clear plastic sheeting (I used 4 of these)
1" pvc and elbows (for the lower frame)
1x2" wood pieces (for the upper frame)
a handful of Screw Eyes
a handful of Open S Hooks
2 Hitching Rings with square plate (the hoop)
3/16" 100' Polypropylene diamond braided rope (depends on how many walls you need)
3/4" Koch single sheave pulley (depends on how many walls you need)
1" 4x8' Polystyrene foam board cut to fit your doorway
20x20x1" True Blue Fiberglass House filter (for the fans)
20x24x1" True Blue Pleated Media Furnace Filter (for the foam door)
https://www.youtube.com/watch?v=Quut5uQfAm0
Airflow
horizontal airflow that circulates from the front of the booth to the back
How Does Airflow in a Spray Booth Work?
Summary:
Crossdraft booths have a horizontal airflow that circulates from the front of the booth to the back. They offer lower operating costs, which make them an ideal choice for the automotive industry.
Downdraft booths originate air from the top of the spray booth and exhaust it through the floor, minimizing the risk of contamination and making for higher-quality finishes.
Air makeup units can be installed to maintain the pressure inside your spray booth in the event that air is not replenished at the rate that it is exhausted.
Choosing the right airflow system depends largely on your booth’s filtration needs and your overall production needs.
Airflow characteristics are a defining element of any spray booth design, so it’s one of the first things finishing operators need to consider when upgrading to a new booth. While there are only a handful of options when selecting a type of booth, each one carries a unique set of advantages and possible drawbacks. Airflow systems impact every aspect of a booth’s operations, so companies need to consider how their chosen design effects operating costs, quality of results and workplace safety.
Crossdraft Booths
Crossdraft booths are often a common choice for relatively basic applications. These designs are characterized by horizontal airflow that originates from the front of the booth and exhausts through the rear. While this allows for flexibility in part sizes and relatively low operating costs, the direction of airflow can increase the risk of flaws and contamination that could compromise the coating quality. Since air is drawn from the front to the back, there is also a risk of the uneven application over time due to overspray.
Downdraft Designs
Downdraft booths are defined by vertical airflow that originates from the top of the booth and exhausts through the floor. Vertical flow is preferable for quality-oriented applications since it minimizes contamination from debris and overspray compared to horizontal. However, manufacturers also have to consider the higher cost of installation, maintenance requirements and demands on the facility.
Modified Downdraft
Modified downdraft booths conduct air from the top of the booth to exhaust vents that run along its base. This creates a near-vertical airflow that offers similar protection from contamination while mitigating some of the drawbacks associated with conventional designs. However, these booths can be maintenance-intensive due to extra ductwork and can require additional safety measures than a standard design would.
Semi-Downdraft
Airflow in a semi-downdraft booth is a true combination of horizontal and vertical. Flow originates from the ceiling of the booth, usually from a supply unit located near the front. The air passes diagonally downwards, is drawn across and exits the booth through the base of the walls or rear. While specific conditions vary, this type of flow is ideal for operators who want to strike a balance between efficiency, speed, and quality.
Other Airflow Considerations
Filtration
The next step after choosing an airflow design is to accommodate the filtration needs of the booth, and whether a recirculation system is a good fit. Filtration is a crucial component in the design in order to ensure employee safety while meeting all regulation codes, including those set forth by the Occupational Safety and Health Administration (OSHA) and the National Fire Protection Agency (NFPA). When in doubt, you should always consult with a Spray Systems expert about how we can satisfy local and national regulations in your booth design while meeting your production needs.
Recirculation
Recirculation features are an option for booths of any airflow design. There are several ways to recycle air and spray compounds through a recirculation filtration system. These systems can help drive down operating costs and reduce waste, but owners also need to consider their potential impact on regulatory compliance and worker safety. It’s also important to determine what percentage of exhaust removal is required for your booth. Recirculation systems are not as efficient for larger booths that require stricter humidity and temperature controls.
Air Make-Up Units
Since booths are typically sealed environments, they can develop higher or lower air pressure than space outside. If air is exhausted from the booth faster than it’s replaced, then it can hinder your operations and increase the risk of contaminants getting inside. In these cases, booths can be equipped with make-up units that maintain positive interior pressure, which helps keep the unit cleaner and safer.
Going with the Right Flow
Every major decision regarding the design of your spray booth can be complicated. At Spray Systems, our experienced team of engineers works closely with our customers to help them understand the key factors to consider when making design selections that fit their needs. We leverage our airflow expertise to build custom solutions that promote efficiency, safety, and long-lasting value. For advice, questions or to request a custom quote, contact our trusted advisers today!
- Coveralls and shoe covers: Disposable or cotton coverall and disposable shoe covers will help to protect your clothing and any exposed skin that may be irritated by paint contact.
- Gloves: Work gloves will protect your hands when you need to sand an area before painting. Wear solvent-resistant gloves for handling paint thinner, solvents and other harmful chemicals. Impermeable disposable gloves are best for water- and oil-based paint.
- Protective eyewear: Use safety glasses, eye goggles or a face shield whenever handling paint or paint thinners, especially when painting above your head or when using a spray applicator.
- Masks: Wear a dust mask when sanding or if you are sensitive to chemicals in the paint. When spray painting, it’s recommended that you wear a paint respirator. Respirator masks prevent many microscopic and scent-free particles from entering your airways during painting and renovation projects. Respirators offer protection against chemicals, harmful vapors and mold spores. Types of Respirator Masks guide.
- Knee pads: Painting baseboards can be hard on your knees. Knee pads give you cushy foam padding to keep your knees from constantly grinding against hard surfaces.
- Respirator masks prevent many microscopic and scent-free particles from entering your airways during painting and renovation projects. Respirators offer protection against chemicals, harmful vapors and mold spores.
Supplies
spray gun
air hose
compressor
paint
thinner for paint
cleaning tools
gun holder
paint strainer/cheese cloth
stir stick
well ventilated area for spraying
respirator
nitrile gloves
safety glasses
long pants
long sleeve shirt
Step 1: The Gun
If you don't want to jump into buying a $100+ gun, a cheap alternative is a gun from the Harbor Freight store. You can get the CENTRAL PNEUMATIC® 20 Fl. Oz. HVLP Gravity Feed Air Spray Gun for $15! If you clean it properly, it'll last a decent amount of time. You can always invest in a nicer more expensive one once you feel comfortable and know you'll use it often. As the saying goes, "you get what you pay for," but that doesn't mean you need to go broke to learn a new skill. This sentiment goes for pretty much anything purchased at HF.
This particular type of gun is called a gravity feed or cup gun. It means the paint cup is above the gun and gravity allows the paint to go into the gun. There are a few different types of guns, but this type is my favorite (I'm honestly not sure why lol. I think starting out it was the easiest one for me to use).
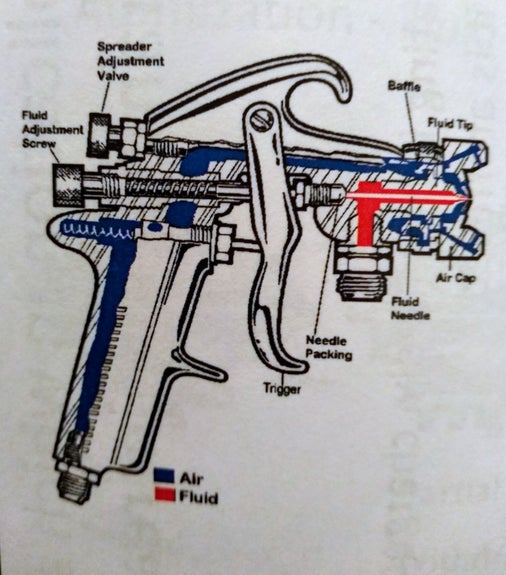
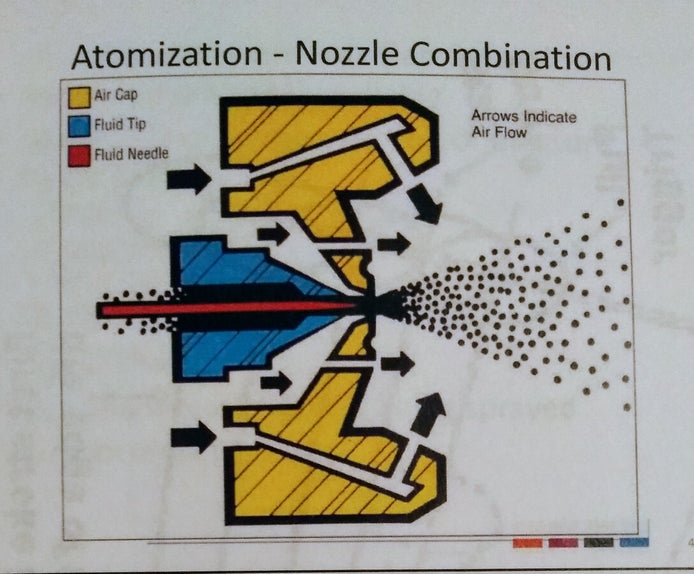
It's important to familiarize yourself with all parts of the gun. The most important are the air cap, fluid tip, fluid needle, fluid knob, air pressure knob, and some guns have a fan knob (I recommend getting a gun with a fan knob).
The illustration of the gun is not a gravity feed gun, nor does it have an air knob (so don't let that confuse you). I posted it so you can see the inner workings and parts of the gun.
***If you decide to buy the Harbor Freight gun, you will also need to buy a 1/4" plug to screw on to the gun for connecting to the air hose.
Step 2: Air
The gun we are using needs to be attached to an air hose which is attached to an air compressor. Air pressure, also known as PSI (pounds per square inch of pressure), can vary depending on the gun and material being used. Make sure to read the paint can and gun instructions to see what the recommended PSI is. Usually, water based paints need less air than lacquer or enamel paints. The average range used is 40-80 PSI. You can set the PSI on your compressor or with an air regulator that can be attached to your gun or air hose.
Step 3: Fluid/Material
All paints need to be thinned down to be able to make its way through the gun. Thin the paint with whatever material the paint can says to use to clean up (e.g. latex/acrylic thin with water,laquer w/laquer thinner, automotive acetone based with acetone, etc). You want it about the consistency of milk.
A good way to test consistency: Dip a stir stick in the paint then hold it up. If you see 3 drips of paint come off the stick, you're usually good to go.
Too diluted and the paint will run, not diluted enough and it will spray out speckles of paint.
Step 4: Fan/Pattern
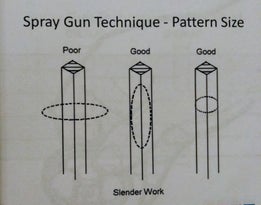
Sometimes the fan is refered to as a spreader, but most people call it a fan. The fan determines the width of the spray. Set the gun to a wide fan for larger pieces to be sprayed and smaller fan for smaller pieces. If you use a wide fan for a small piece, you'll have a lot of over spray which wastes paint and money. Likewise, if you use a small fan for a large piece, it will take a lot longer because you'll have to do more passes with the gun and there's a greater chance of spraying unevenly.
Remember, when you change the fan, you need to change the amount of fluid that comes out and PSI too.
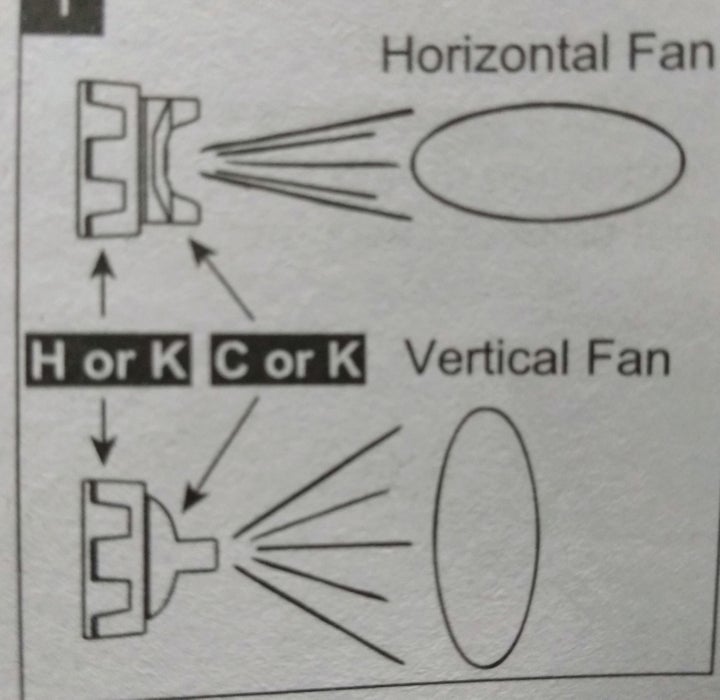
As pictured: Orientation of air cap: If the two pieces that stick out from the cap are vertical, you'll get a horizontal spray. Horizontal equals vertical spray. Just remember that it's the opposite of what it looks like it should be.
Step 5: Setting Up
Now that you know what the consistency of the paint should be, you are ready to pour it into the gun.
***Important! Always use a paint strainer to pour the paint into the gun.*** Even if your paint looks clean and smooth, it probably has a booger or two that the strainer will catch. If you don't strain, the boogers (boogers being clumps of dried paint, dirt, whatever else falls into the paint) will clog your gun. Remember: a clogged gun is no fun! You can buy cone shaped paint strainers at just about any major hardware store. If you can't find any strainers, fold up some cheese cloth and use that instead.
Place your gun in the gun holder (if you purchased one) so you can pour your paint in. Fill the cup 1/2-3/4 full. Don't fill it to the top because it will definitely splash out; plus the gun will be heavier and your arm will get tired faster. Place the lid on and make sure it's tight, you don't want paint dripping out from under the lid and ruin your work.
Turn your compressor on. Attach a coupler to the plug you added to the gun. I recommend a quick connect to the end of your air hose. This will make a HUGE difference. It allows you to easily and quickly connect/disconnect your gun from your air hose. You can also attach one to the other end of the air hose to make connecting to the compressor easy too. Set ithe compressor to the proper PSI. Make sure there are no air leaks from the hose or the gun. If there is, see the Troubleshooting page.
Step 6: Safety
No matter what type of paint you are using, it's important to protect your health while doing so. Always read the paint can and/or Material Safety Data Sheet (MDS) and follow their safety instructions. You are spraying paint particles into the air and they can easily get in your lungs, on your skin, or even in your eyes. Don't be a tough guy, where safety gear! Your future self will thank you.
To be the safest, wear:
- NIOSH approved respirator w/ organic vapor cartridges (pink)
- protective clothing to cover arms & legs
- nitrile gloves
- safety glasses
At the very bare minimum, wear a respirator.
Also, it is important to work in a well ventilated area no matter what material you are using.
Step 7: Testing Before Spraying
You always want to do a test spray on a piece of paper/cardboard/wood so you can adjust your air, fluid, or fan knobs. Also, this gives you the opportunity to make sure your paint was mixed properly before you jump right into your project. Additionally, you can check the spray pattern to make sure it's coming out even. I'll address any issues on the Troubleshooting page.
Step 8: Time to SPRAY!
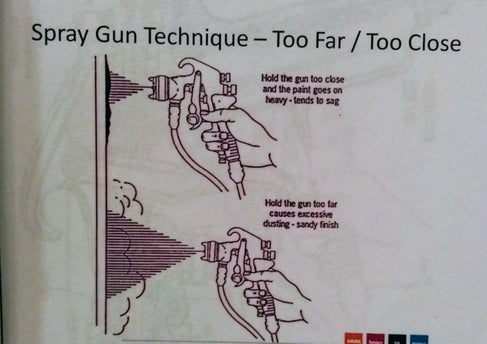
When you are happy with the quality of spray during your testing, it's time to SPRAY for real! You want to hold the gun about 5-8" away from the surface you're spraying (that's about a fist or spread out hand's distance).
Hold the gun perfectly perpendicular to the surface. If it's tilted, you'll get uneven coverage.
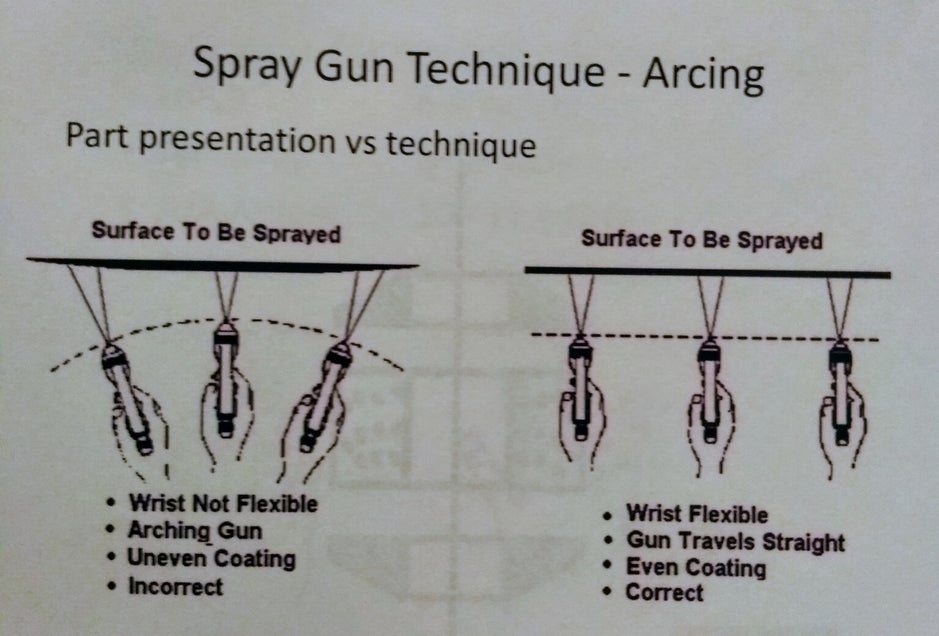
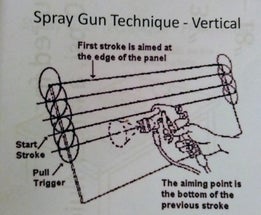
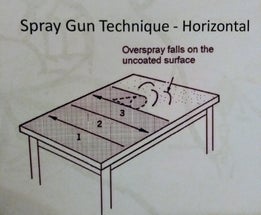
With the fan oriented vertically, you'll start at the top and work your way down in rows. Point the tip of the gun at the edge of the surface. You'll have a bit of over spray, but this will give the edge the same amount of coverage as the rest. As pictured: working left to right, you'll pull the trigger and move your hand and arm left to right (like a typewriter, NOT like an oscillating fan). Don't keep your arm in one place and just move/tilt your hand (pictured in image 1); this will cause uneven coverage. You want to keep your arm and hand perpendicular to the surface at all times. At the end of the row, slightly release the trigger, but only enough to stop the material, not the air. Move down to the next row and repeat right to left. Picture 2 illustrates how you will overlap your rows. Always point the tip of the gun at the bottom of the last row.
It will take a lot of practice to get even rows. If it's too dry between rows, aim your gun closer to the previous row to prevent any gaps.
Step 9: Tips
*Before starting to spray your piece, always pull the trigger away from the piece's surface first. This will prevent any dried up boogers on the nozzle from getting on your piece.
*When you reach the end of a row or column, lightly release the trigger just enough to stop the fluid from coming out when you move your hand down to the next row or over to the next column. This helps keep the edges from getting unevenly heavy with material. (If you've ever sprayed a spray can, I'm sure you've noticed the ends of what you sprayed are always the heaviest because you're basically doubling up on material there when you move your hand down/over.)
*Keep your finger down on the trigger just enough so the air is always coming out; even when you aren't releasing paint. This will maintain your air pressure at the same consistency. When you release the trigger completely, shutting off the air, this could cause air pressure fluctuation and allows time for the paint to dry on the tip (which causes boogers when you start the air up again).
*Always spray with the lowest air and fluid pressures possible while maintaining finish quality.
*If your first layer is sprayed in rows (side to side), then spray the second layer in columns (down to up) and vise versa. This will help get complete coverage.
Step 10: Clean Up
Cleaning your gun is a bit of a pain, but definitely necessary!
Some instruction manuals say you should only clean your gun with mineral spirits, although I haven't met anyone who sticks to this. Most people will clean their gun with the material they used to thin their paint (e.g. water, lacquer thinner, paint thinner, acetone).
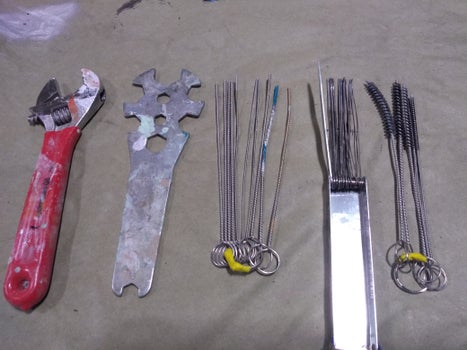
Remove the needle, air cap, fluid cap, and paint cup. The fluid cap is usually difficult to remove and requires a wrench. An adjustable wrench works fine on some guns, but they do make spray gun wrenches that have standard hexagonal shapes to make it easier and prevent slipping. You may also need a spray gun wrench if a standard wrench is too fat to fit.
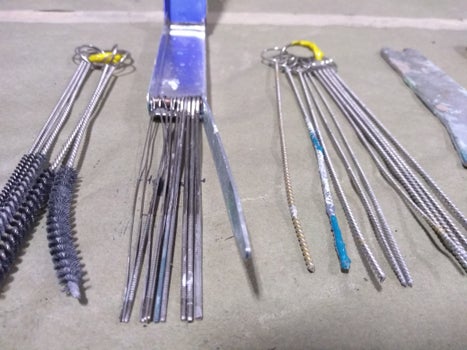
You'll want to clean all of the gun parts individually. I use a variety of tools (as pictured). You'll figure out what works best for you. Make sure all paint is removed from inside the gun, the air holes, needle, cup, etc.
Before reassembling, squirt a small amount of lubricating oil on all the threads to maintain the integrity of the threads. Reassemble gun.
To make sure the gun is 100% clean inside, reattach it the the air hose, fill the cup with a little bit of the material you used for cleaning, and spray air through the gun. This will help push out any clumps you may have missed while cleaning.
Spray gun wrench:
- (a cheaper one, although I have not used this particular wrench) https://smile.amazon.com/dp/B018ST0TX2/ref=dp_cerb...
Set of cleaning needles, wire, and brushes:
Step 11: Troubleshooting
Unfortunately, there isn't one clear cut answer for a problem you might be having. It's just trial and error.
Fluid leaking from packing nut
- packing nut loose
- packing worn or dry
Fluid leaking from front of gun
- packing nut too tight
- fluid tip worn or damaged
- needle worn or damaged
- needle spring broken
- wrong size needle or tip
Spray is fluttering
- material level low
- fluid passage obstruction (clog)
- loose or damaged fluid tip
- material too heavy, needs thinned
- air vent clogged
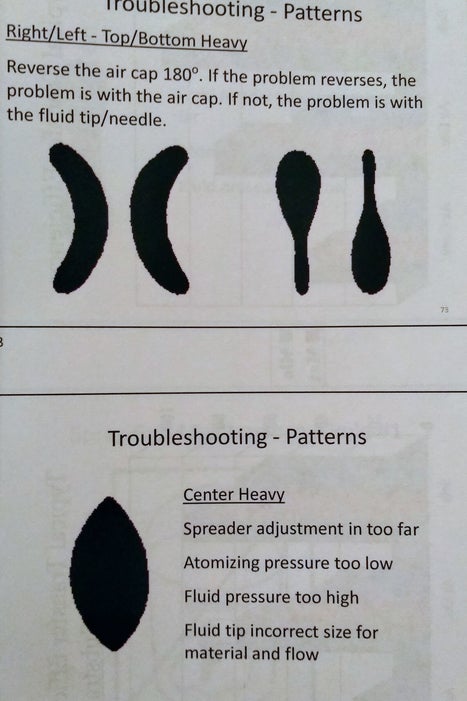
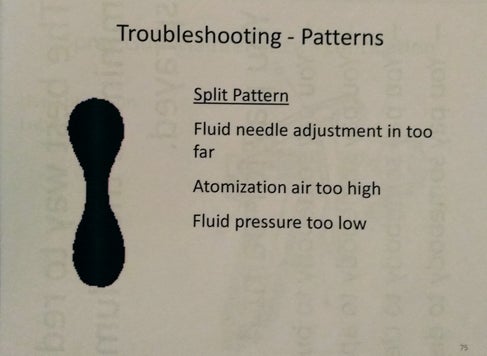
Gun spraying out odd shapes
- I attached 2 illustrations that will help with this problem
Paint is coming out dry and dusty
- holding gun too far from surface
- didn't mix in enough thinner, add more thinner
- air pressure too high
- moving gun too fast while spraying
- not letting enough fluid out, loosen fluid knob
Paint too runny
- holding gun too close to surface
- Mixed in too much thinner, add more paint
- letting too much fluid out, tighten fluid knob
Step 12: After Learning the Basics...
After you learn the basics of spraying, then you can dive deeper into the more complex parts of spraying. There is so much more information out there about types of guns, fluid tip sizes, air hose length/sizes, ventilation systems, building a spray booth, regulators, pressure loss, CFM, temperature, humidity levels, etc.
I hope this tutorial was informative enough to get you started. Feel free to leave any questions in the comments section.



No comments:
Post a Comment